Getting Started With Acuity Scheduler Dashboard

Overview :
Hey everyone, welcome to this exciting episode of BotPanels, Today we are going to talk about getting started with the Acuity Scheduler Dashboard.
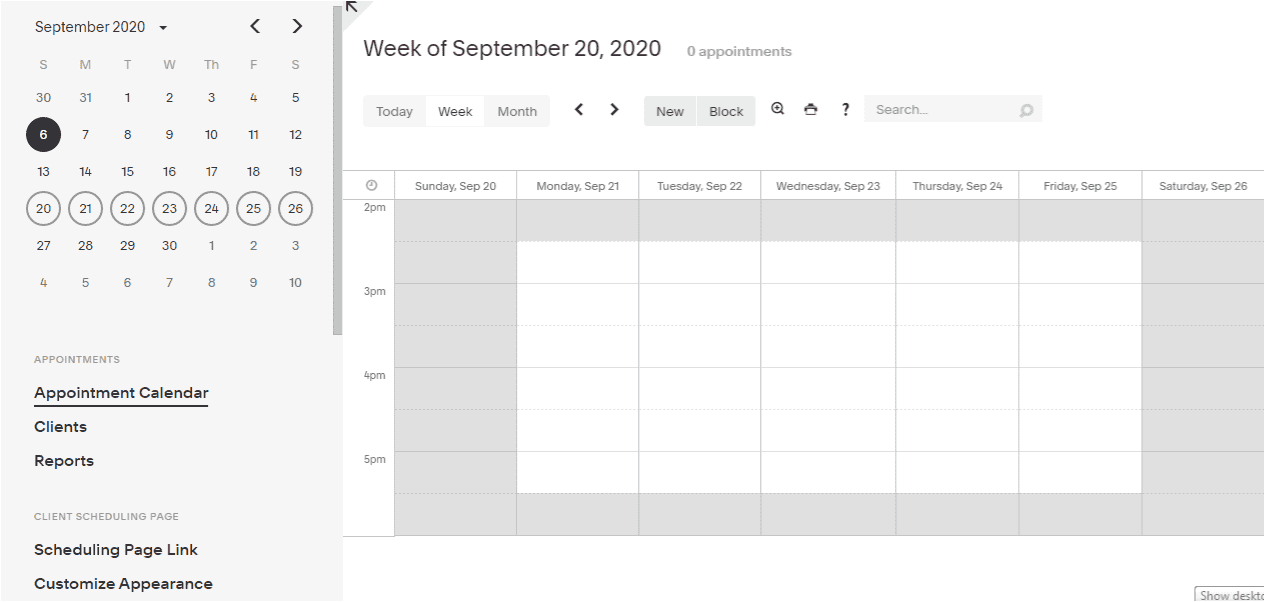
Dashboard: This is your landing page when you log in to your Acuity Scheduler account. We are going to have an overview of the navigation system of Acuity Scheduler. We got a calendar here in the main body part. You can change this calendar view as per your convenience.
Just click on these tabs to change the view like daily, weekly, or monthly. How many appointments do you have in your calendar is shown here.
These two arrows are given to move next or previous.
This new tab is used to book a new appointment at the admin level.
And this block tab is used to block particular days of time in the appointment scheduler.
This calendar tab is used as a filter to show a particular calendar and its services.
With this zoom icon, you can increase the size of the calendar view on the screen.
A print icon is used to take a print out and this question mark icon will take you to the help section.
Left Navigation: An important point to note here is, all menu items are given on the left-hand side. We are going to use this scroll bar and we will see the entire menu and their sub-menus here.
This left navigation is broadly divided into five main categories.
- Appointments
- Client Scheduling Page
- Business Settings
- My Account
- And a log out button is given at the bottom.
Appointments: Let’s have a quick review of all these menu items. We start with the Appointments category.
The appointment section has three menu items:
- Appointment calendar
- Clients
- And reports.
If you click on these menu items, this section of the page will get change and the menu with its sub-menu will remain on the left-hand side.
This screen is the default view of the Appointment calendar menu item.
When you click on clients, you will reach on to this page.
And you will see that the Client menu has two sub-menu items here.
In the same way, if you click on reports, you will reach on to this page and will get the Report sub-menus here.
Client Scheduling: Next category is the client scheduling page.
It has two menu items.
- Scheduling page link
- And Customize appearance.
Business Settings: The next category is of business settings.
Menu items in this category are:
- Availability
- Appointment types
- Intake Form questions
- Package Gift and subscriptions
- Manage Users
- Integrations
- Sync with other calendars
- Payment Settings
- Email Settings.
My Account: The next category is My Account from where you can manage your account settings.
And the last option is to log out to exit from this user dashboard.
You can use Acuity Scheduler on your smart mobile phones as well. You can download the Acuity Scheduler Mobile App from the app stores and use it with your Acuity login credentials.
We will discuss some other interesting features of ChatBots in subsequent episodes of BotPanels. This episode on Getting Started with Acuity Scheduler Dashboard completes here.
You can subscribe to BotPanels to get access to interesting learning videos and free tutorials.
Footer Note: Small, medium, or companies of all sizes are now integrating ChatBots and online schedulers into their websites and social media. ChatBots and online schedulers automate repetitive tasks and customer support. It improves response rate and helps to convert more website visitors into buyers. Chatbots and online schedulers are used as virtual employees that provide assistance or give information quickly.
BotPanels help you to build your own customize ChatBot and online scheduler from scratch. There are two ways to get it done. First is, define your own algorithm with response logic and maintain a database of answers. Second is, using the ready-made ChatBot and online scheduler platforms like BotPanels. Now you don’t need to struggle with study materials and watching hours of video to learn chatbot and online scheduler deployment. Our ‘Done For You Service‘ build the ChatBot and online scheduler for you and provide a remote training session on how to operate it.


 Master AI tools like ChatGPT, Canva, Grammarly, vidIQ & tubebuddy.