
How to setup FaceBook comment guards
Overview :
Hey everyone, welcome to this exciting episode of BotPanels, Today we are going to talk about How to setup Facebook comment guards in your chatbot.

Facebook comment guard:
Facebook comment guard is an excellent option to make subscribers via your Facebook comments. Let’s have a practical example to understand how it works and how to set up in our chatbot.
We are going to click on the chatbot hyperlink given in the header and then click on the chat starters sub-menu.
Create Comment Guard:
We found an option of comment guards in the left-hand side navigation. Just click on the comment guards and we reach on its workspace. Now click on this create comment guard link.
Name Comment Guard:
The first and foremost thing is to give some names. We can name it to comment guard as simple as that. Don’t forget to save it.
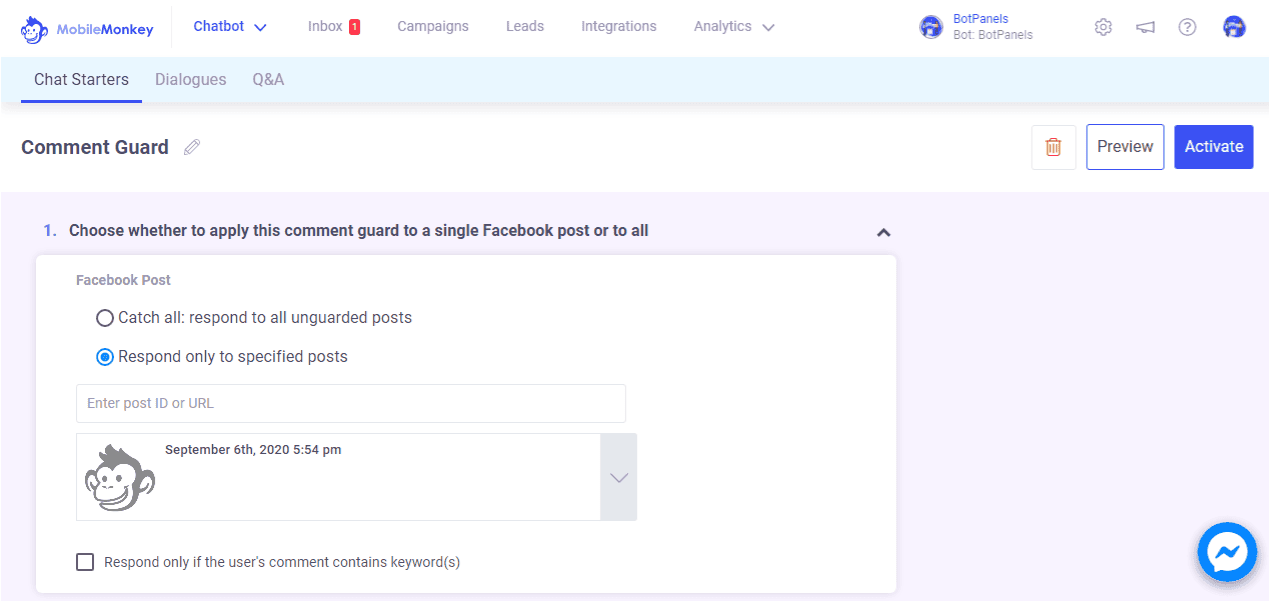
Applicable Post:
The very first option is to choose whether to apply this comment guard to a single post or to all. If you want to apply comment guard on all the posts then select this option and if you want to apply comment guard only to some specific posts then select this option.
We are going to select a specific post here to explain how it works. Ok, we select this post that we have posted on this particular date. When someone comments on this post, a message will show to them.
Dialogue:
let’s complete the flow and draft the message first that we want to show when someone comments on the post. In this section, you can create a dialogue for users who engage with your comment guard.
If you do not know write a dialogue. We have a separate learning video on it.
Add Dialogue:
We are going to take the text widget and write dialogue, Thanks for leaving a comment. Users reply with text and we will save the response to attribute for later usage.
We can add one another dialogue here to get the user’s email. Again we will use the text widget and write the dialogue.
Hey there, can I get your email address in case we get disconnected?
The user replies with the email and we will save it in the email attribute.
Frequency Cap:
The final step in the comment guard setup is to specify a frequency cap for comments. This is how many times you want the message to pop up against the user’s reply.
The default value is 1 hour. That means if a user posts more than one comment then only send one message every one hour. You can change this value as per your requirement.
Activate:
Once you are done editing on this page don’t forget to activate the comment guard. Click on this activate the link and now this comment guard is live now.
Let’s have a look how it looks like in real. We move on to the page and visit that particular post where we set up the comment guard.
Ok, this is the post and we are going to comment on it. It is very useful information. Have you notice, we got a reply via messenger. This is the same message that we have written as a dialogue in the chatbot.
It means the comment guard is successfully set up and working fine.
We will discuss some other interesting features of ChatBots in subsequent episodes of BotPanels. This episode on Facebook comment guards completes here.
You can subscribe to BotPanels to get access to interesting learning videos and free tutorials.
Feature
Feature