
How To Create A Service And Appointment In Scheduler
Overview :
Hey everyone, welcome to this exciting episode of BotPanels, Today we are going to talk about how to create a service and an appointment in acuity scheduler.
Appointment Type: We will click on the appointment type’s link given under the business settings. We reach on to the appointment type page.
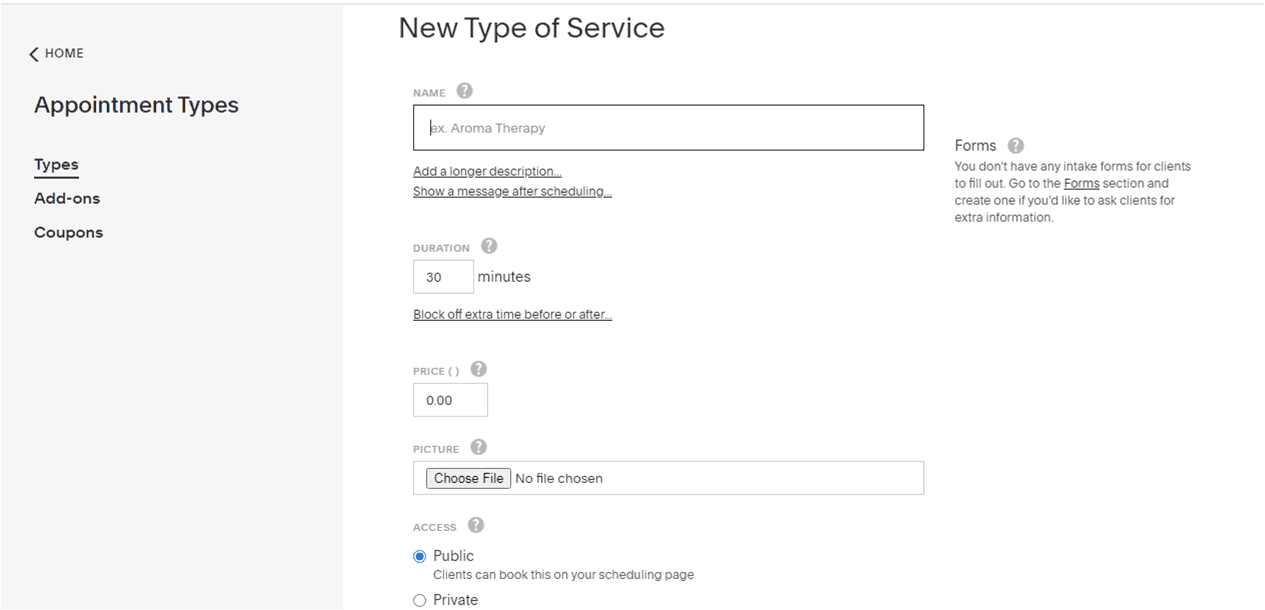
Now we click on a new type of service.
We will fill the information here on this page regarding a new type of service.
Let’s do it practically here.
Options
Name of service: First we are going to type the name of the service, say free consultancy. It is also having an option of longer description where you can add more about your products & services.
Confirmation message: It also has the option to show a message after scheduling. On this page, you can write confirmation messages like we have got your details and we will keep in touch with you or something like that.
Duration: Scroll down the page, you will get another option of duration. We will make it for fifteen minutes. Point to note here is, time duration should always be in minutes.
For example, if you would like to enter one hour as duration then you need to enter sixty minutes for that.
Buffer Time: There is one more option given hereunder, it is blocked off extra time before or after. Basically it’s a buffer time between two appointments.
If we add ten minutes here, it means ten minutes extra time blocked off before the next appointment set up.
We set up our service time of 15 minutes but after adding this buffer when a user will go for appointment scheduling, your calendar shows your unavailability for twenty-five minutes instead of fifteen minutes.
Charges: The next option is to charge your clients for your service.
If you want to collect the payment upfront, you can add that amount here or can leave this field blank as it is.
Add Picture: You can also include a picture on your scheduling page but it should not be more than one point five MB in size.
Category: This is an option of category. It is beneficial when we have multiple appointment types and multiple services; we can categorize them to organize better.
For instance, if a free consulting service is related to the chatbot.
We can create a new category and name it as chatbot and then saved.
Category names will appear on the scheduling page and help clients to see their interest in categories.
Accessibility: Now we come on to the accessibility option.
There are two options to choose from public or private.
Public and Private: Public appointments will show on your scheduling page.
And it is accessible to all for scheduling.
Private appointments are hidden from the main scheduling page.
These are accessible to only admins and clients having this private scheduling link. They can book the appointment via this private link only.
Just go through with it and make sure everything is set. Click on create appointment type.
And here you will see your new service and appointment type get created.
We will discuss some other interesting features of ChatBots in subsequent episodes of BotPanels. This episode on how to create a service and an appointment in the acuity scheduler completes here.
You can subscribe to BotPanels to get access to interesting learning videos and free tutorials.

Feature
Feature
 Master AI tools like ChatGPT, Canva, Grammarly, vidIQ & tubebuddy.