
How To Customize Appointment Scheduler Link Sharing
Overview :
Hey everyone, welcome to this exciting episode of BotPanels, Today we are going to talk about how to customize appointment scheduler link sharing.
Let do it practically for clear understanding.
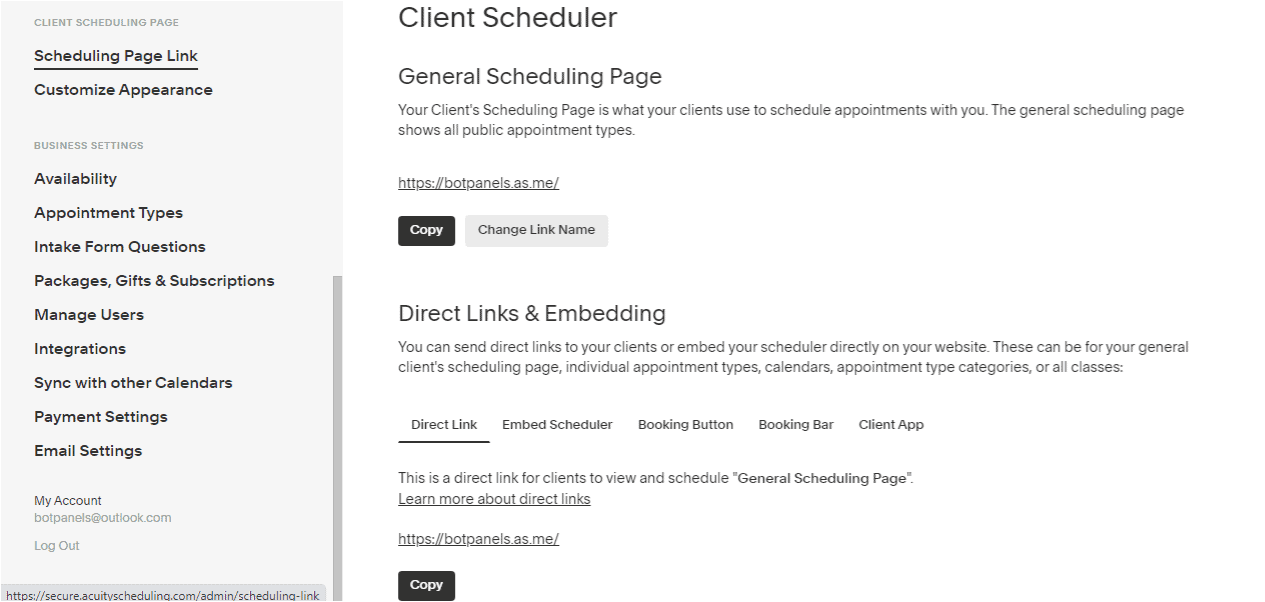
Scheduling Page: First we are going to click on the scheduling page link which is given under the client scheduling page heading.
When we click on this link, we reach on to this workspace.
Link Customization: This is the first customization option from where we can change this link name. It’s a great feature that gives us the liberty to write our business name here.
You can write a name that matches your service and easy to remember to your clients. We click on the change link name and going to write BotPanels here.
The new link will be followed by as dot me because we are using acuity scheduler services. Once you made the changes don’t forget to save it.
You can change this link whenever you wish to but it is advisable not to make frequent changes in the link.
General Scheduling: Point to note here that it is your general scheduling page. So when you share this link to your clients or audience, it shows all of your services on the scheduler page.
If you do not know about the difference in between public scheduling and private scheduling, we have a separate learning video on it. And that learning video title is how to create a service and appointment in the scheduler.
Let’s scroll down the page.
Generate link: If you are interested in generating a link that has specific services, you can do it very easily. It is clearly mentioned here that you can send direct links to your clients or embed your scheduler directly on your website.
You need to select the general clients’ scheduling page, individual appointment types, calendars, appointment type categories, or all classes.
So when we click on it, we found some options here as we have discussed recently.
We just scroll down and if you want to share an individual service, let’s say this one. Then it would generate a specific URL for it.
If you notice that this URL is different that we generated earlier. It’s having an additional content at the end of the URL that shows that it is specifically meant to this service only.
Let’s cross-check it now. We are going to click this link and see how the scheduler page looks like. It’s working fine as you can see that only a particular service is showing on the appointment scheduler page.
Direct link: This direct link option is very useful where you want to send certain direct links to a certain audience. And only those having the direct link would be able to use the appointment scheduler.
Acuity gives you this customization option to filter out the content and make direct links.
We will discuss some other interesting features of ChatBots in subsequent episodes of BotPanels. This episode on appointment scheduler link sharing completes here.
You can subscribe to BotPanels to get access to interesting learning videos and free tutorials.

Feature
Feature
 Master AI tools like ChatGPT, Canva, Grammarly, vidIQ & tubebuddy.