How To Setup Your Availability In Acuity Scheduler

Overview :
Hey everyone, welcome to this exciting episode of BotPanels, Today we are going to talk about How to set up your availability in acuity scheduler.
If you wish that your clients access your schedule and fix an appointment themselves for a service then you must need to make sure that you have set up your hours of availability and also mark the time when you are not available.
Set up Availability: Let’s have a practical example of how to set up the availability in the acuity scheduler.
You will find a link to Availability under business settings. Just click on it.
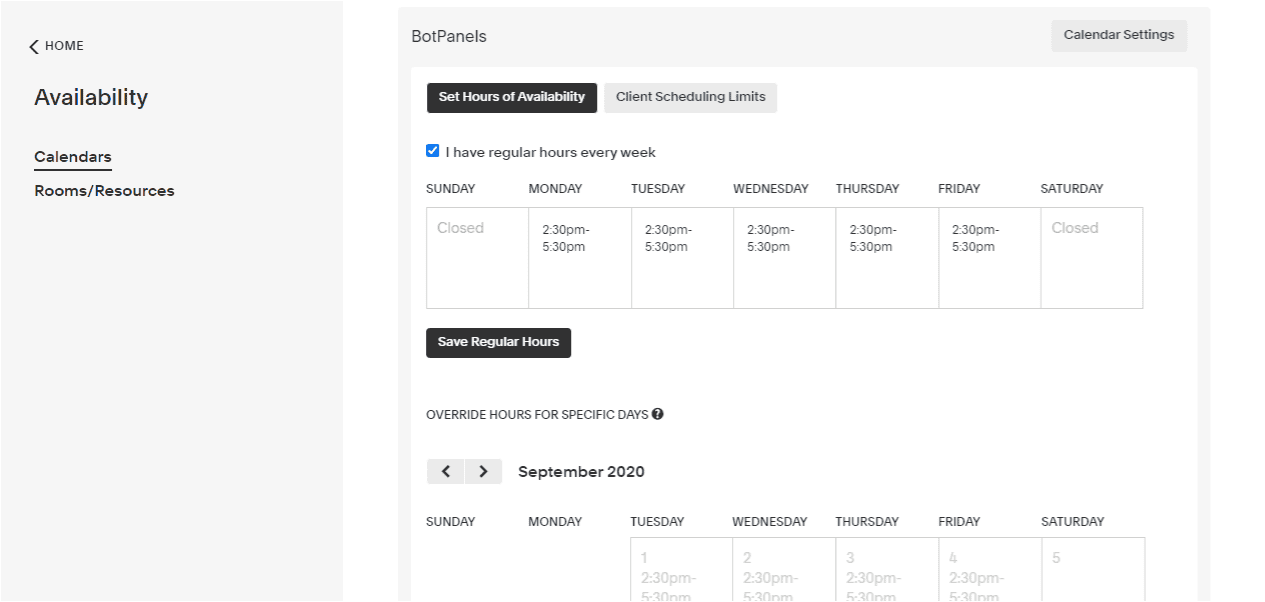
Now you reach on the Availability setup page. You will see a link here, set hours of availability. We are going to set up our availability for a regular week.
We will fill our working hours here.
Opening Closing Hours: We are closed on Sunday. We click here and type closed.
Now we click on Monday and set our availability from four pm to six pm.
We can copy-paste the same working hours for the rest of the week or type in different hours as per your availability. It is just an example; you can type in your actual working hours here.
We are closed on Saturday. So click here and type in closed.
In this standard week, I am available only in between four pm to six pm. So the client would see these hours of availability only in the scheduler. Once you setup your availability, don’t forget to save your regular hours.
Days Off: Now a common question is what about for those days where we are going to take off from the work for any reason.
How can we make those days off in a running scheduler?
You can do it very easily in Acuity Scheduler.
All you need to do is to scroll down to that particular day and then change the schedule of that particular day.
You can make it off or change the time as per your requirement. For example, we scroll down to this particular day and change the time here from one pm to three pm.
And for this particular day, we are going to take off, so we write here closed.
If you refresh your scheduler now, you will notice that changes would reflect only to those particular days where you have made the changes, and the rest of your schedule remains intact.
Block Off: Another common question is, how to make the changes in the scheduler if we have more than one day off or having a vacation.
You can do it day by day in the same way as we have done here.
There is one another feature in Acuity scheduler of block off time where you can block multiple days.
We click here on block off time and then select block multiple days. We are going to put in duration, from this particular date to this particular date.
We will type in official leave here and then click on block off time. We will get a message of successfully blocked off.
We are going to cross-check it on our calendar and see whether it’s been done or else. So it is shown that it is done successfully.
It is a good practice that whenever we made the changes in availability, we should cross it with the Appointment calendar. We can see here that particular days of official leave have been successfully blocked.
We will discuss some other interesting features of ChatBots in subsequent episodes of BotPanels. This episode on how to set up your availability on the acuity scheduler completes here.
You can subscribe to BotPanels to get access to interesting learning videos and free tutorials.


 Master AI tools like ChatGPT, Canva, Grammarly, vidIQ & tubebuddy.